¶ Messenger
The Messenger feature allows school staff to send bulk communications through Email, SMS, or Voice Call to students, parents, or guardians. Messages can be targeted based on criteria such as:
- Attendance
- Grade
- Course
- Fees
- Custom groups
The system also provides a message history for tracking previously sent communications.
¶ Contact Information Source
- The Messenger feature retrieves recipient phone numbers and email addresses from the Student: Profile >> Parent/Guardian tab.
- If a phone number or email address is missing in this tab, the system will not send the communication to that recipient.
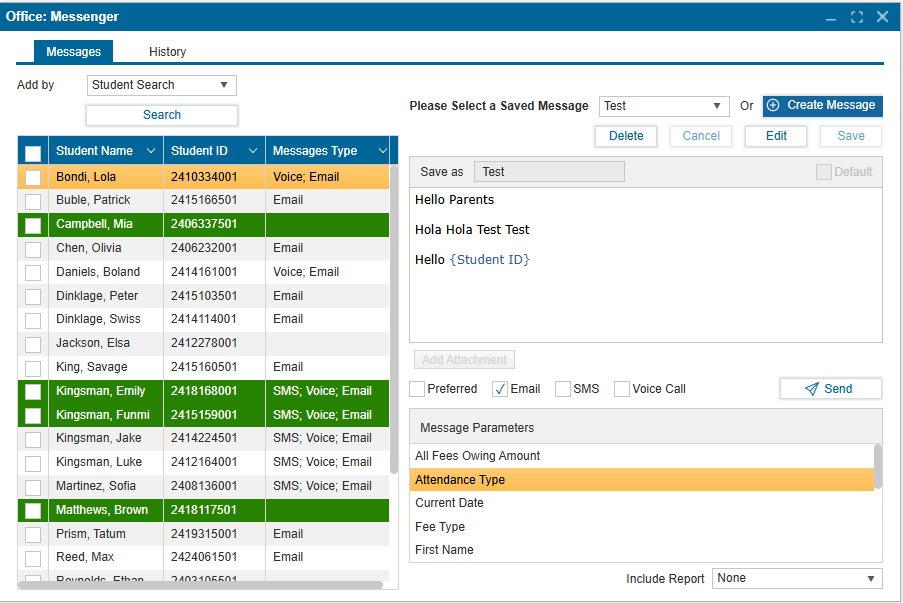
¶ Messages Tab
Navigate to Office: Messenger >> Messages tab
¶ To Add Recipients to the table:
-
In the Add By dropdown, choose how you want to select recipients.
- Attendance- Select based on absence or lateness (this will only populate after attendance has been taken in Office: Attendance)
- Course- Select all students enrolled in a specific course.
- Fee Type- Select students assigned a specific fee type.
- Fees Owing- Select students with outstanding balances.
- Grade- Select all students in a specific grade.
- Homeroom- Select all students in a homeroom.
- Student Group- Select members of a predefined student group.
- Student Search- Select based on custom search results.
- Teacher- Select all students taught by a specific teacher.
-
Based on the option selected above, additional fields may appear (for example, if Fee Type is selected, an additional field listing all the types of fees assigned will be listed)
-
Once all required fields have been selected, the matching list of students will be populated in the table on the left.
-
Check individual boxes to select specific students or use the header checkbox to select all.
¶ To Create a New Message:
- Click Create Message
- Enter the Title of the message
- Compose the message in the text area below.
- Double-click available parameters to insert them into the body of the message.
- To reuse the message later, click Save to store it as a template. Otherwise, proceed without saving to send a one-time message.
- If attaching a report or file, select Email as the delivery method (attachments are not supported for SMS or Voice Call).
- Click the “Send” to deliver the message to selected recipients.
¶ Using a Saved Message:
- In the Please Select a Saved Message dropdown, choose a pre-saved template.
- Click Edit to modify the message if needed.
- Click Save to confirm changes and send.
Note: Once a message is sent, its record will turn green in the list to indicate message has been queued for delivery.
¶ Preferred Communication Settings
-
Preferred checkbox automatically selects the parent’s preferred communication channel, as set in Student: Profile >> Parent/Guardian.
-
Administrators may uncheck this option to override these preferences and send the message through another channel, if necessary.
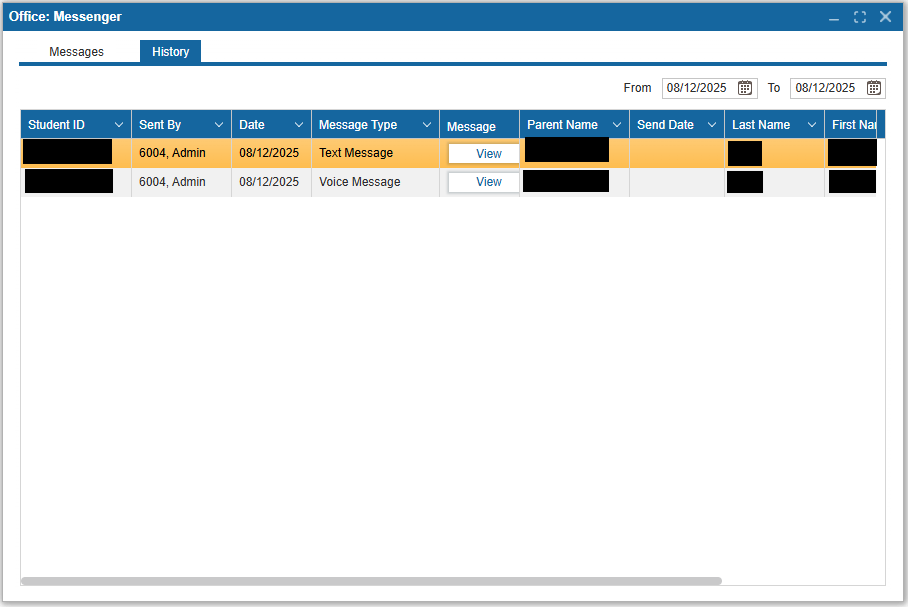
¶ History Tab
This tab provides a record of all messages sent through the Messenger feature. It allows staff to review message details, track recipients, and confirm delivery status.
-
Navigate to Office: Messenger >> History tab
-
The history tab displays all messages sent based on the date range selected. Each record includes:
- Student ID
- Sent By - The staff account that sent the message.
- Date - Date the message was sent.
- Message Type - Email, SMS (Text Message), or Voice Call.
- Message - Click View to open the full message in the Message View popup.
- Parent Name - The intended recipient’s name.
- Send Date - Date and time the message was sent.
- Last Name / First Name - Student’s name.
- Sent - Checkbox indicating whether the message was sent to the recipient. (Hidden by default; scroll right to view.)
- Status - Shows the delivery status (e.g., Sent, Empty). (Hidden by default; scroll right to view.)
-
Message Filtering:
- The From and To date pickers can be used to filter messages sent within a specific date range.
- Click the column headers to sort messages by Student ID, Date, Message Type, and other headers available.
Note: If a message fails to send, verify the recipient’s contact information in Student: Profile >> Parent/Guardian before attempting to resend.