¶ Create & Assign Fees
¶ Creating, Assigning, Waiving, and Removing Fees
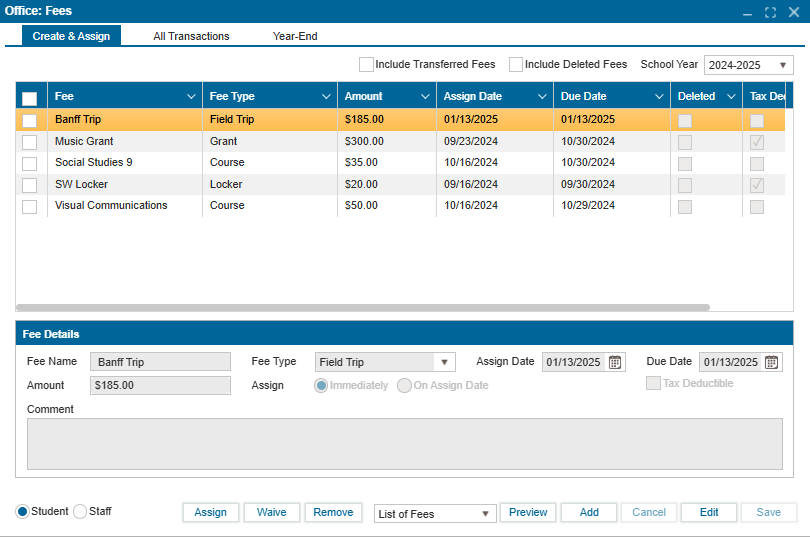
¶ Creating the Fee:
- Navigate to Office Fees >> Create and Assign tab.
- Click the “Add” button at the bottom of the window to create a new fee record.
- In the Add Fee window, enter the necessary details:
- Fee Name: Enter the name of the fee (e.g., Road trip).
- Fee Type: Select from the dropdown (defined in Setup: Parameters 1).
- Assign Date: Date the fee is assigned (defaults to current date).
- Due Date: Date the fee is due.
- Amount: Enter the fee amount.
- Assign Immediately: If selected, the fee is assigned on the default date.
- On Assign Date: Fee is assigned on the specified Assign Date.
- Tax Deductible: Check if the fee qualifies as tax-deductible.
- Comment: Enter additional information, if any.
- Click Save to create and confirm the fee.
¶ Assigning the Fee:
- Use the checkbox to select the fee to be assigned.
- Select the appropriate radio button:
- Student: Select if assigning the fee to a student.
- Staff: Select if assigning the fee to a staff member.
- Click the Assign button to open the search functionality and select the student or staff to assign the fee to.
- Click Submit.
- A confirmation message, “Fee Assigned Successfully,” will pop up once the fee has been assigned.
Note: If the fee has already been assigned to a student, the system will notify you.
¶ Waiving a Fee:
- To waive a fee, select the fee using the checkbox beside it.
- Click the Waive button.
- In the Waive Fees window, select the student whose fee will be waived.
- Enter the amount to be waived in the Waive field (either the full or partial amount).
- Click OK, then click Submit.
This fee transaction reflects in Student Fees as soon as it is completed.
¶ Removing a Fee:
- To remove a fee, select the fee using the checkbox beside it.
- Click the Remove button.
- A popup will display a list of students/staff assigned the fee. Use the Find button to search for specific students, if necessary.
- Select the students/staff whose fee should be removed using the checkbox.
- Click Submit to complete the removal.
The fee removal will be reflected in the Student Fees transaction.
¶ Action Buttons:
- Preview: View a list of fees and associated details.
- Add: Create a new fee record.
- Cancel: Cancel an ongoing action (e.g., creating or editing a fee).
- Edit: Enable edit mode to update or delete a fee.
- Save: Confirm and save changes made to the record.
Note: Use the School Year dropdown at the top of the window to view fees from previous years.
Version: 252 Updated: February 4, 2025